Assalamualaikum to all Vortex Electrica fans.
One of the problems faced when we, as electronics/electrical students do projects is that very little practical environment pervades within the department. Aside the fact that we all have laboratories, an electronics store to distribute components with the permission of supervisors, some geeks carrying around toolboxes with some perfboard circuits inside, there is still so much to learn regarding electronics.
Kudos to the current Head of Department of Electrical Engineering for making changes to the department, for a lot has changed for the better then, and it is time to move on to further our experience in doing circuits and introduce some tweaks as well.
So how do we start?
For ambitious students, a full fledged tutorial on PIC microcontrollers is the best way to go around it. However we must account for students who are only willing to do simple projects which will make them appreciate the beauty of electronics. And most students are unwilling to spend much money on buying components.
I am not saying my suggestions are the best, but for a lot of subjects, very valuable experiences can be provided to students who do some projects which pertain to the subject itself. Electrical students are divided into four, in my experience:
1. The ones who just want to finish their degree and nothing more
2. The ones interested in doing projects in hardware form (electronics, power, etc.)
3. The ones interested in software/programming
4. The ones who are not interested in anything.
The second and third will be our discussion.
This is the layout of Universiti Malaya's Electrical Engineering curriculum (download the file for a complete listing) which can be used as a medium to do projects:
First year
1. Electronics 1:
-Construct a temperature sensor using an IN4148 diode and some transistors, best marks goes to the ones who manage to linearize the output of Temperature versus Voltage (and the hardware can be passed for further research on low-cost sensors). Should cost only RM10.00 max.
-Drive a relay using different transistors, a report can be done with each team using different transistors, response time, backward EMF study due to relay chatter, how to suppress relay chatter, etc. Costs perhaps RM5.00
-Build a bridge rectifier (Reaaaaaalllllllly frustrating when EE students don't know how to use a damn diode, OKAY!!!) for AC signals. The best marks will be given to the ones with lowest drop-out voltage, and fastest response time, with lowest ripple, and so on. Cost? perhaps RM3.....
-Build a H-Bridge to control motors using transistors. Best marks to the ones who manages lowest drop-out voltage, highest input/output current ratio, efficiency, etc. Each team will use different transistors, zero marks to duplicate circuits. Cost?.. I think RM15.
2. C++ Programming:
-Change it to C programming, and let 1st year students blink an LED or two at the generic PIC main boards. Using a PIC12F and some perfboard, the circuit can be completed in one day, costs at most RM 10. More advanced programming? Drive a motor speed using PWM. More? Interrupt. More? At your discretion.
3. Digital Systems
-Build logic gates using diodes/transistors. Each team will be assigned to different types of diodes, and different gates as well. Cost? Less than RM5, assured.
-Learn to use Flip-flop ICs/Logic Gate ICs and do some applications. Cost? Less than RM15.
....And so on.
2nd year
4. Electronics 2:
-Amplify signals from the heart using any type of sensor. Cost: RM 20. Best marks go to the ones who manage the best accuracy compared to a standard ECG.
-Make different types of filters/instrumentational amplifier using op-amps (SAY NO TO THE LOUSY 741 ICs!!!) Cost: RM 5
-Process signals from various sources using a software in a PC. Like quantifying heartbeat signals, bird calls, light intensities, temperature, and so on.
-Build an oscillator using op-amps.
.....And other millions of op-amp projects.
5. Instrumentation
-Start using PICs to drive motors, detect readings using ADC, display signals, use temperature signals, strain gauges, range sensors like IR diodes, RF modules (315 or 418 MHz ones), drive relays to operate a 30V motor, for instance... and so on. This project has most options actually. Cost: From RM 20-100.
6. Electric Machines
-Build motors... Now this is very fun. Different motors for different teams, so students can build stepper motors, DC brush motors, brushless motors, relay switches, alarms, etc, anything which requires electromagnetism and mechanical motion. We managed to introduce this culture during our 2nd year. Voila!!
3rd Year
7. Electromagnetic Theory
-Build RF modules. Longer ranging, the better. Give some restrictions: Doesn't introduce interference to the existing signals (otherwise it'll jam things up), low power, and so on.
-Build inductive current sensors, like the ones used in Power Electronics Labs.
8. Microprocessors
-NOW.... proceed to using higher quality PICs and give 'em any kind of project which involves sensors, robots and whatnot. Too many projects are on the 'net. Build a frickin' Asimo if they want.
9. Energy Conversion & Power Transmission
-Again, we manage to be the pioneers of projects involving generators. We can settle down with the DC/AC generators, or also explore Solar Cells, Wind Power Turbines, Thermal Energy, and so on.
Example: Make a portable battery charger using a small water tank which is heated up to propel a turbine to charge a cellphone. Campers can use it when they're going in jungles, so when they make bonfires, they also can charge their cellphones. Also, with solar cells too.
10. Feedback Control Systems:
-Aha.. there is so much we can do around here. I suggest: Build a coffee-maker using stepper motors, which need to be modeled using Laplace/Fourier/Z Transforms. This utilizes transient responses of the motors as well. Usage of PICs required.
Also, we can build a simple pick-and-place robots using PICs and servo motors too.
11. Power Electronics:
Build your own buck, boost, buck-boost, Cuk, and so on Regulators. Is it so difficult? We'll never know if we don't try. The problem is many EE students don't even understand the meaning of Power Electronics.
There is one very interesting circuit:
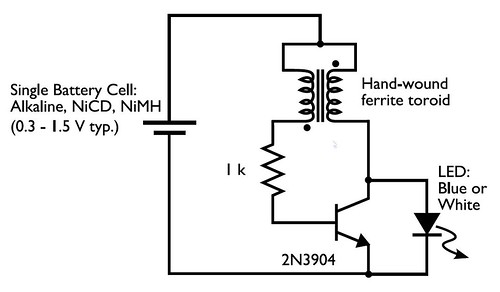
It demonstrates the usability of a nearly dead cell to power up an LED! Therefore it 'boosts' the voltage, demonstrating the significance of power electronics and boost circuits. This project can be assigned EASILY!!! So why do we hesitate in giving students such simple projects?
In conclusion, look at how much projects can be done with just Googling around. To the ones who think it ain't important, I'll just ask one simple question: What do you remember during lectures? Even for a geek like me, I remember nothing except jokes from lecturers!! BUT I remember nearly every detail of projects done by our Team VORTEX ELECTRICA, and it is the memory which made me value the experience in the University. I'm sure all the other members felt the same way.
I hope future Malaysian students who take up EE in any university will ask their lecturers to give projects like these. They're fun and most importantly, life is a lot about memories, and this is an experience which will be hard to be obtained in the times you are already working.
And oh, if you're going to bitch about cost of the projects, remember that you have spent more on food in a single day than most of these projects! So to the lecturers out there (if you're reading this) just give the projects to them and you'll be surprised how capable Malaysian students are actually! This SHOULD be the main part of the continuous assessment for the students. Honestly, I'd put 30% on projects, and 10% on tests/assignments. The rest is exams, and it's fine by me. To me, all that mattered during my tenure (academically speaking) in UM are three things: Kind lecturers who demonstrates "formidability", the three projects in hardware form assigned by lecturers themselves, and finally our final year project. The rest will be very scantily remembered, sorry to say, even the labs and equipments don't mean much to me except the times I actually needed it.
Vizier87 is signing out.