Showing posts with label 7-segment. Show all posts

Sunday, September 22, 2013

An update on Phaserion & Variator: After three years...

Assalamu'alaikum everyone,

It has been a slow year for all of us are busier than ever. However, we're still burning with project ideas. On my side, I have just setup my small working area and I have been using the Phaserion & Variator for three years. (It has been that long? Whoa!).

This time, I'm going to provide some updates on Phaserion, which I think is a very handy equipment I have built all these years. It is an adjustable power supply with a range of 1.5-22V, and I have been using it for just about everything for my electronics projects. 

This is a video of the addition I made for the Phaserion:

Variator with a shiny new display

The feature addition on the Phaserion is pretty important- I added a 7-segment display to indicate the voltage, which is helpful if you have various projects with different supply requirements. The PIC used was the ever-so-simple PIC16F876 (Which I first bought after looking into Nigel's tutorials) and I think it is high time it is permanently embedded into a proper application gizmo for all that I've learnt from Microchip's PICs. We'll have a small tutorial on the 7-segment later, in which the programming was done using MikroC. (I don't think I could have progressed well in my programming if I'm stuck to Assembly language. No hard feelings there Uncle Nigel.). Here's the additional circuit:
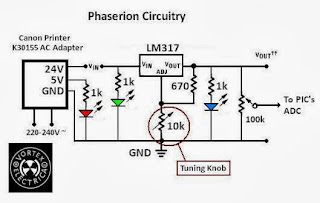


A bit of a stumbling block here- How do I detect 22V when PIC is capable only up to around 5V? The answer is simple: A trimpot. Install a trimmer between the output power, and let it swing to it's maximum output. After doing so, slowly tune your pot to give a 5V output. Therefore the output is now 22V Ξ 5V. Swing your voltage down. It will rescale to a lower voltage! 

Some of the pictures may speak a squillion words:
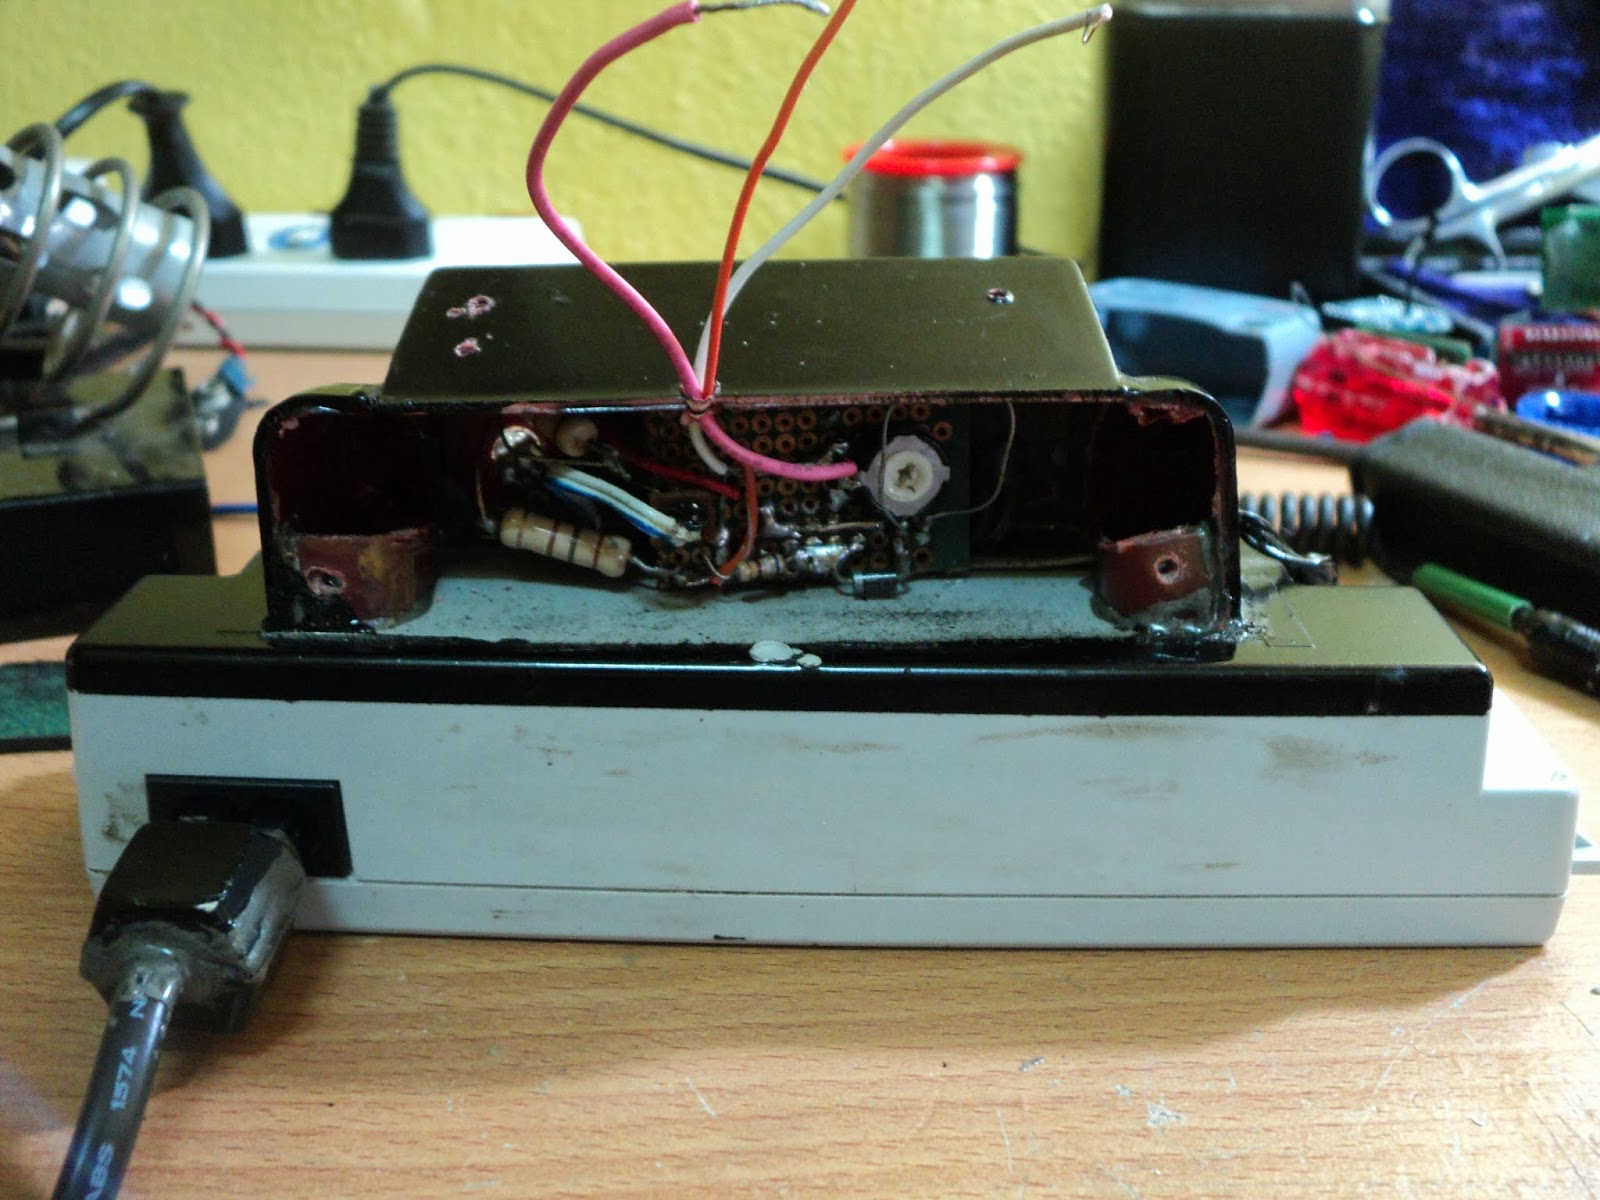


You can see that black-and-white trimmer/trimpot (bought when I was shopping with Beautifulmind seven years ago, you know!) for scaling down 22V maximum swing to a 5V  maximum swing... that'll be for the PIC.


Phaserion adapted for my Starke drill batteries' charging

...and it can be used for my breadboard supply

...Yup. I used my old Chinese multimeter terminals for an in-situ power supply (good for testing nook-in-the-crannies)

Adapted for crocodile clips as well (Just for show dudes)

And since we have so many cables, a good way to organize them would be to use small cardboard cylinders to store 'em cables. Trust me, a good working space is a TIDY one.

So that's all for this article. The circuit addition is pretty simple but we'll cover that later in more detail when the 7-segment tutorial is done.

Keep on Vortexifying everyone! 
Regards,
Vizier87.

Thursday, March 24, 2011

Construct your own DC Power Supply Mark II : Phaserion reporting.


All Glory to the Almighty Allah who governs every detail of our life. No one can do anything except with the will of Allah SWT.

As told before, this is the sequel of the article about Wall Warts before this. So.. this article focuses on more structural insight, which is very simple but saves a lot of money. Before this, I used an adapter which has tuning knobs to it. However, the voltages are fixed with a fixed increment of several values. So... Some kindergarten electronics to kick in!

Initiation

This time, I want more freedom in choosing a voltage, and I have a very good quality adapter for this purpose. The one I obtained looks like this:


A Canon K30155 AC Adapter for printers, where I keep busted printers and managed to scavenge this. The other components below are some of the parts needed for the construction of the prototype; a perfboard, a plastic tuning knob from an ancient radio, a potentiometer and an LM317 Variable Voltage Regulator.

From the adapter, there are two outputs, a 5V/0.2A rail and a 24V/0.55A rail with respect to a common ground. So, I'd like to channel the 25V out to be fed into a regulator, which in our case is an LM317. The LM317 has a maximum current output of 1.5A so the adapter is tolerable for output variation.

The circuit to vary the voltage is very simple, as shown in the datasheet:


Construction

So from the structure of the adapter, it's quite obvious how would it serve its purpose as a Power Supply, where it acts as a platform. Now.. Some imagination would be useful:


You may need to open the figure above in a new tab if you'd like a closer look. *winks*
So.. from the figure:

1. Plastic panels from an old clock.... looks pretty suited for the job.

2. Estimates of the dimensions so that the circuit and everything else fits in properly. The springy cable is from an old phone charger, I thought it's very good for messy jobs where you might tug your circuits accidentally, so the springy part sort of absorbs some motion. Just an idea guys... no need to follow everything.

3. Holding the structure using rubber bands so that rigidity is achieved for the epoxy glue to dry out properly. Note that the epoxy glue is applied on the inner side so that the smear of the glue is not exposed. For aesthetic purposes. (Rubber bands? Oh noooo....Nah, it's okay, they're proper for the job)

4. The curved plastic sides added, also from the clock panels, glued accordingly.

5. Added the small plastic pieces to act as a platform for the screw threads for the panel to close the opening.

6. The front view, see the parts where the epoxy glue fills in. Also, the previous Variator Wall Wart is shown there for size comparison. Note that they have the same output socket to be plugged into the conditioning circuit, so it's easy for us to alternate between the two supplies according to our preference without changing the interfacing power sockets.

7. Added indicator LEDs for three categories: A green LED to indicate the input power to the regulator, a red LED to indicate the 5V rail, and blue for the 24V rail. Note that for the LED which is powered from the 24V rail, we'll need a Resistor with a higher tolerance. Also, note that the technique used to protect the wiring is similar as shown in the Variator article, where I encased the wiring using a pen casing, glued to the male socket.

8. Plastic panel cut to size as closure, which can be reopened for inspection if necessary.

9. Just a dash of aesthetics... sprayed black paint at the upper part of the structure.

10. Phaserion Power Supply completed. Below, the circuitry of the Phaserion is provided.


Foreclosure of a Design.

Now.. at last, just for fun, I also would like to construct the plug to supply from the mains, but just so you guys know, there are ratings of the wiring which may be ahead of you guys, so do this only under supervision from someone who has electrical knowledge. I take NO responsibility if you get yourself injured through electric shock. This part is not necessary if you already have your own standard main power plugs.


So... knowing the risks mentioned, we proceed:

1. A plug from a CRT circuitry which fits the dual terminals of the adapter, an ex-soldering iron cable (you know... they get damaged easily, especially the cheap ones.. so just so that you know, I prefer Ceramic Heater Soldering Irons. ) .... and to cover the whole thing, I used scavenged keyboard buttons to encase the exposed part of the wiring.

2. Soldered the terminals.

3. Some extra insulation using electrical tape, and fitted into the keyboard buttons, which now serve as a casing.

4. Press 'em using the cute G-clamp and glue 'em.

5. After drying, fit and a dash of black spray paint, you can try it.. looks like any normal plug, hopefully. *winks*.

6. The LEDs light up, ready to be used.

Conclusion

So... there you are. The structure is simple, rigid, and insyaAllah will last for a long time. The Recycletronics theme is still utilized at its best in this project, where I probably used up around only a few ringgit. Useful for research projects and prototyping as well, and you don't have to fish out fifty bucks for branded DC supplies... just fish out your junk and use the rest of the money for charity.

I named this prototype Phaserion because the variation of the voltage can be changed accordingly, so as to a phase shift. So there you go: Phaserion and Variator, working in tandem.

May Allah be pleased with us when we reduce our expenses for ourselves and more for other people who may need more.

All the best to the ones out there.
Related Posts Plugin for WordPress, Blogger...